Showing posts with label baking. Show all posts

14 July 2016

Blueberry Chocolate Chip Drop Biscuits

100_7947I'm not a big fan of biscuits.

I know, I know.  How very un-Southern of me.

But it's true.  Now, I'm not saying I never eat them.  I can quite adequately tear down some biscuits slathered with an inch of sausage gravy.  Who couldn't?

And actually, that illustrates my point about my relationship with biscuits.  I usually find them to be dry.  Very dry.

Then I tried these biscuits – these easy, mix 'em up in one bowl, drop biscuits. Not dry at all.

Blueberry Chocolate Chip Drop Biscuits and More

I love my pastry cutter / blender to cut butter into a dry mixture.  You can also use a fork, or your hands.

100_7945

I was gifted a gallon of fresh off the no-pesticide vine blueberries about a week ago, so adding those plump bursts of juiciness into these biscuits was a must.

100_7949

Then I threw in a few chocolate chips.  I was first introduced to the combination of chocolate and blueberry when I made some fudgy blueberry brownies a couple of years ago.  Since I was a bit blown away by the flavor, I don't think the combination gets enough attention.

Give these jewels a try.  I doubt you'll be disappointed.  If you want to kick the sweetness up a notch – and eat these babies for dessert – try drizzling some honey over them.  O. M. G.

Blueberry Chocolate Chip Drop Biscuits

100_5397Original recipe by Jennifer at Bake or Break.

Ingredients

  • 2 cups all-purpose flour
  • 2 tbsp organic cane sugar
  • 2 tsp baking powder
  • 1/2 tsp salt
  • 1/4 cup butter, softened and sliced
  • 1/2 cup sour cream
  • 1/2 cup whole milk
  • 1/2 cup fresh blueberries
  • 1/4 cup mini semi-sweet chocolate chips

Instructions

  1. Preheat oven to 375 degrees. Lightly butter a baking sheet. [Note: I baked these in a toaster oven!]
  2. Whisk together flour, sugar, baking powder, and salt. Cut in butter. A pastry blender makes it super easy. You may also use a fork or your hands.
  3. Stir in the sour cream, then stir in the milk. Fold in blueberries and mini chocolate chips, trying not to break too many blueberries.
  4. Drop dough onto prepared baking sheet. Original recipe calls for "3 tablespoons (not quite 1/4 cup)" per biscuit. I used a flatware tablespoon, heavily mounded with dough. Pretty easy to eyeball.
  5. Bake for 20 minutes then check. You're looking for a light brown color and a biscuit that is firm to the touch. Try not to over bake. My little oven didn't require more than 22 minutes.

Yield: 1 dozen

Shared at This Is How We Roll, Thrifty Thursday, From the Farm, Happiness is Homemade, Tasty Tuesdays, and Simple Saturdays.

Disclosure: This post contains affiliate links, which means I may receive a very small commission if you click a link and buy something. This helps pay for the RV, supports our mountain homestead dream of owning land, as well as my blogging activities, and makes the dogs happy.  Hopefully, the purchase benefits you, too!  The price you pay will be no different than if you arrived at the same destination through any other link. My opinions are my own, to be sure. If I link to a product and say I like it -- I truly like it! Thanks for reading, following, and supporting Stephlin's Mountain.

From my mountaintop to yours!

05 May 2015

Strawberry Banana Yogurt Cake ~ Baked in a Toaster Oven

Life without an oven stinks. Especially when you love to bake. And since our beloved Destiny lacks the appliance, I haven't been able to bake in over two months! Well, I could stand for that no more. So we bought one.
A toaster oven, that is. ;-)

I had a bit of cash left on an Amazon gift card so, while it's not exactly high dollar, we were able to get a good one: a Black & Decker Countertop Convection Toaster Oven was delivered just a few days ago.

I was able to sample some recently received strawberries at work the day before yesterday. They were Delicious! I was actually surprised at how tasty they were, and made sure to buy some on the way out. I already had a couple of bananas at home, and had pinned the base recipe for this cake not long ago. It was a perfect storm, it seems.


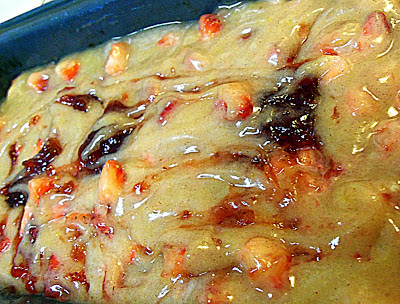
You only need one bowl to mix this cake. A plus for those with limited space! The base recipe does not call for bananas, but I couldn't resist the combination. I simply folded in slices at the end of mixing the cake batter. And I think I made my dollops of strawberry jam a bit too big. Next time, I'll be more inclined to swirl it in to the top.


Here's proof I baked it in a toaster oven! :-)


And the yummy result. It's somewhat similar to the best strawberry bread ever I posted about here. Greek yogurt makes it super moist. Recipe follows.


Strawberry Banana Yogurt Cake

Strawberry Banana Yogurt Cake
Adapted from Betty Crocker recipe here.

Ingredients

  • 2 containers (5.3 oz each) Greek blended strawberry yogurt
  • 1 1/2 cups granulated sugar
  • 3/4 cup extra virgin organic coconut oil (can also use vegetable or canola)
  • 2 tsp vanilla (make your own!)
  • 3 eggs
  • 2 1/4 cups all-purpose flour
  • 1 tbsp baking powder
  • 1/2 cup strawberry jam
  • 1 1/4 cups quartered fresh strawberries (grow your own!)
  • 2 tsp granulated sugar
  • powdered sugar, for garnish (optional)
  • 2 bananas, sliced (optional)

Instructions

  1. Preheat oven (toaster or regular) to 350°F. Grease and flour a 13x9-inch (I used a 10X12-inch) pan.
  2. In a large bowl, stir together yogurt, 1 1/2 cups granulated sugar, oil of choice, and vanilla until well combined. Mix in eggs, one at a time, until well blended. Add flour and baking powder; beat with wooden spoon until smooth. Fold in sliced bananas, if using.
  3. Pour batter into pan, spreading evenly. Dollop strawberry jam on top of cake batter. Sprinkle with strawberries and remaining 2 tsp granulated sugar.
  4. Bake 45 to 50 minutes or until toothpick inserted in center comes out clean. (Mine took 45 minutes in the toaster oven.) Cool 20 - 30 minutes. Sprinkle with powdered sugar, if so desired.
Yield: 12 servings

P.S. I hope you'll forgive me rocking the paper plates and foil pan. Not very crunchy or homestead-y, I know. Sometimes ya gotta do what ya gotta do. Ya know? I'll make up for it when we get moved, I promise. :-)


Shared at Making a Home - Homemaking Linky, Tasty Tuesday, Teach Me Tuesday, Tickle My Tastebuds, Tuesdays with a Twist, and Homemade Mondays.


Disclosure: This post contains an affiliate link, which means I may receive a very small commission if you click the link and buy something. This helps support my mountain homestead dream as well as my blogging activities, and the price you pay will be no different than if you arrived at the same destination through any other link. My opinions are my own, to be sure. If I link to a product and say I like it -- I truly like it! :-) Thanks for reading, following, and supporting Stephlin's Mountain.

26 July 2014

Cinnamon Bread. Quick and Simple.

I love quick breads. Mix the batter, pour it in a pan, pop it in the oven to bake. That's it. No long, drawn out process required.

A while back I had a craving for cinnamon bread. I was thinking of a traditional loaf with yeast and all, but was too lazy to go through the motions necessary for my desired result. Ever been there? Yep. Me, too. Quick bread to the rescue!

I found a recipe to try at Allrecipes.com, gave it a go, and was happy I did. It's not the prettiest loaf I've ever seen, but it sure is yummy. There's a nice sweet crust on top, and the cinnamon flavor can be tasted throughout. Since the "swirl" technique is used, I wasn't sure that would be achieved -- glad I was wrong. Craving fulfilled.

Want another peek?


Go ahead.  Get your drool on.  I won't tell.


OK.  You've been (fairly) patient.  Recipe after one more.


Simple Cinnamon Quick Bread

Submitted to Allrecipes.com by bettina.

Original recipe advises to wrap finished (and cooled) loaf in foil and let sit overnight before slicing. I totally did not do this. (Who could wait? I had a craving, remember?) But I'm quite sure the slices would have looked prettier had I followed this direction. :-)

Ingredients

  • 1/3 cup + 1 cup granulated white sugar
  • 2 tsp ground cinnamon
  • 2 cups all-purpose flour
  • 1 tbsp baking powder
  • 1/2 tsp salt
  • 1 egg, beaten
  • 1 cup milk
  • 1/3 cup vegetable oil

Instructions

  1. Preheat oven to 350 and lightly grease a 9"x5" loaf pan.
  2. Mix together 1/3 cup sugar and 2 tsp cinnamon in a small bowl. Set aside.
  3. In a large bowl, combine flour, baking powder, salt, and remaining 1 cup sugar. In another bowl, combine egg, milk, and oil. Add wet ingredients to dry. Stir until moistened.
  4. Pour half the batter into prepared pan. Sprinkle with 1/2 cinnamon and sugar mixture. Repeat with remaining batter and cinnamon / sugar. Run a knife through the batter to swirl all together.
  5. Bake for 45 - 50 minutes. Use the toothpick test to ensure doneness. Let cool in pan 10 minutes before removing to a wire rack to cool completely.

Yield: (1) 9"x5" loaf


Shared at Simple Saturdays, Simply Natural Saturdays, and some of these other fine hops.


24 July 2014

How to Make and Store Your Own Dried Orange Zest

Have I ever told you about my love for my dehydrator? (Heh, Heh, of course I have.) Well here's yet another task it can handle for you!

How to Make and Store Dried Orange Zest

The zest of an orange is the outermost, colorful part of the peel. It contains concentrated, highly flavorful oils great for baking delicious sweets and breads. You can most certainly use it in savory cooking, as well.


All you need to do to make zest is remove this colorful part from the orange. You can do this by using a knife to cut strips, a simple grater, or a utensil more specifically designed for zesting. (I have a Microplane and wouldn't trade it for the world.) The important thing to remember is not to go into the pith, or white part of the peel. This has an unappealing flavor. Also, don't forget to wash your fruit before zesting.

If you're lucky and find yourself with a lot of oranges, making a large quantity of dried zest is made easier by using a food dehydrator. (I have a dwarf orange tree right outside on the patio. It's producing intoxicatingly fragrant blooms and fruit -- I'm impatiently waiting for those babies to ripen.)


Additional note: I also watch for oranges (or lemons or limes -- you can zest them too, ya know) in the reduced section of my produce department. I can sometimes find 3 lb. bags of oranges for 99¢!

To dry your zest, simply spread it out on a shelf of the dehydrator and set your temperature to 135°. Walk away and let it do its thing until the zest is completely dry. Alternately, you can use your oven if the temperature can be controlled to that low degree, and you have the time. You can also simply let the zest air dry on your counter top (I have no idea how long that would take, though).

BTW, if you end up with too many oranges to eat, run them through a juicer (this is mine). That's what I do. I then freeze the juice in these little stackable Ball freezer containers and pull one out to place in the refrigerator each night before I go to bed. Freshly squeezed juice is ready to drink in the morning.

Your fresh-dried orange zest can simply be stored in a jar with a tight lid in your pantry. I can't say exactly how long it will last. I can say I've had some in my pantry for a few months, and it still has flavor.

How much does it make / save? I got about an ounce out of three large oranges. I've seen this amount go for $3 - $4 in stores...made mine for pennies!

Shared at All Things Thursday, Fabulously Frugal Thursday, Thrifty Thursday, and some of these other fine hops.


I was featured!


Disclosure: This post contains affiliate links, which means I may receive a very small commission if you click the link and buy something. This helps support my mountain homestead dream as well as my blogging activities, and the price you pay will be no different than if you arrived at the same destination through any other link. My opinions are my own, to be sure. If I link to a product and say I like it -- I truly like it! :-) Thanks for reading and following Stephlin's Mountain.

18 June 2014

Fudgy Blueberry Brownies (and Martha Stewart Helped!)

I have a confession to make. Prior to yesterday, I had never made "real" brownies. You know, the kind that do not come from a box. Please don't ask what took me so long. I'm ashamed and have no answer.

One of the things I'm most pleased about since I have been slowly transitioning to real food, is the amount of actual ingredients I now keep in my pantry.  I no longer open the door to a bunch of pre-packaged box dinners made with Lord-only-knows-what.  It's quite exciting for me.

So you know why I was tickled pink (blue?) when I came across Amanda's recipe for Blueberry Brownies at i am baker. Blueberries, butter, chocolate chips, sugar, eggs, vanilla, cocoa powder, flour, and kosher salt -- check!

The recipe is extraordinarily easy. So much so that I promise to never make brownies from a box again. Seriously. Ne-ver.

And the blueberries? Oh. My. Imagine taking a bite of fudginess, followed by a literal burst of berry flavor. Yep.

Another gadget that made these brownies super simple is Martha Stewart's Brownie Slice Pan*. The chances of me ever purchasing one for myself would have probably been slim to none (think "who needs that?"). However, it was a gift from my loving mother. And now that I have used one, I adore it!

It reminds me of a shallow square springform pan, the difference being you lift the product out of the pan instead of "springing" the pan off the product. Get me?

The pre-sliced sectional is a bonus; inserting it is not required.  One of the suggestions from the box is using it with rice krispie treats, and I do think the pre-slice thingamajig would be great with those.


*Note on product link above: First, it's an affiliate link (see disclaimer below). More importantly, this links to the "Chicago Metallic" pan. I assure you it is the same pan that came in the Martha Stewart box I have. My pan even has "Chicago Metallic" imprinted on it. Feel free to look at the "Martha Stewart" version here. As of this moment, it appears to cost about $2.50 more for her name.

Shared at The Homemaking Party, Lovely Ladies Linky, Mountain Woman Rendezvous, Wake Up Wednesday, Wonderful Wednesday, and some of these other fine hops.


Disclosure: This post contains affiliate links, which means I may receive a very small commission if you click the link and buy something. This helps support my mountain homestead dream as well as my blogging activities, and the price you pay will be no different than if you arrived at the same destination through any other link. My opinions are my own, to be sure. If I link to a product and say I like it -- I truly like it! :-) Thanks for reading and following Stephlin's Mountain.

25 May 2014

Blueberry Banana Cake Donuts

It all started with a recipe for Blueberry Cherry Baked Donuts I found over at the Taste and Tell blog. She posted it back in 2012, and I pinned it months ago. Fast forward to Christmas 2013, and Mom gives me a gift card to Bed, Bath, & Beyond (woo hoo!). A few days ago, I used a portion of it on a new donut pan. The only thing I had to do today was take my 16 month old boy to the vet, so why not take my new pan for a spin afterwards?


I decided to do just blueberry donuts early on, but at the last minute chose to throw an overripe banana in the mix. The batter might have ended up a bit thick, but the donuts are moist and tender with a hint of banana flavor in addition to the blueberry freshness, so I call it a win.

The first lesson I learned with my new donut pan, is be careful not to overfill. My first attempt could have passed for mini bundt cakes. ;-)


My second batch was much more donut-like:


I was so anxious to try them, I didn't wait for them to cool to add glaze. I just slapped some homemade cream cheese icing I had in the fridge on one and took a bite!

YUM!

I did eventually get to the glaze, though, and that made them even better. Just feast your eyes on these blueberry beauties:


If you've stuck with me this far (thank-you!), I'll bet you'd like the recipe. Give these a go, and let me know what you think.

Blueberry Banana Cake Donuts

Adapted from Deborah's Blueberry Cherry Baked Donuts at Taste & Tell blog.

Ingredients

  • 2 cups all-purpose flour
  • 2 tsp baking powder
  • 1/2 tsp cinnamon
  • 1/2 tsp salt
  • 3/4 cup sugar
  • 3/4 cup honey flavored Greek yogurt
  • 2 eggs
  • 1 tsp vanilla
  • 2 tbsp melted butter
  • 1/4 cup vegetable oil
  • 3/4 cup blueberries
  • 1 mashed ripe banana (the riper, the better)

Instructions

  1. Preheat oven to 325 degrees. Coat donut pan with non-stick spray.
  2. In a medium bowl, mix together flour, baking powder, cinnamon, and salt.
  3. In a large bowl, mix together sugar, yogurt, eggs, vanilla, melted butter, vegetable oil, and banana. Stir in flour mixture. Fold in blueberries.
  4. Fill donut pan about 2/3 full. Bake for 10 - 15 minutes. Use the toothpick test to be sure they're done. Turn out of pan and cool completely on wire rack.
  5. Whisk together 2 cups powdered sugar, 1 tsp vanilla, and 3 - 4 tbsp milk for glaze. Top donuts when cool and return to wire rack to dry.
Yield: 18 donuts

Shared at Simple Life Sunday, The Heritage Homesteaders Hop, Simple Saturdays Blog Hop, Simply Natural Saturdays, Happiness is Homemade Link Party, Tasty Tuesday, and Teach Me Tuesday.


Disclosure: This post contains affiliate links, which means I may receive a very small commission if you click the link and buy something. This helps support my blogging activities, and the price you pay will be no different than if you arrived at the same destination through any other link. My opinions are my own, to be sure. If I link to a product and say I like it -- I truly like it! :-) Thanks for reading and following Stephlin's Mountain.

24 May 2014

O.M.G. Strawberry Bread

We had a good deal on some nice strawberries recently at work, so I partook and purchased a couple of pounds. Little did I know how that simple transaction would change my life. Exaggeration? I think not, but you be the judge.

I was poking around the 'net for a strawberry bread recipe, and what I found did not disappoint. After giving it a go, what resulted was quite possibly one of the best things I've ever eaten. Definitely the best strawberry bread I've ever eaten.

Yep, all that strawberry goodness in one loaf!

The recipe is from Saveur. More specifically, Saveur kitchen assistant Farideh Sadeghin. It has a yield of two loaves, but, me being me, I cut it in half for one loaf. I know that doesn't always work in baking, but this one turned out just fine.

There is cinnamon in the mix, and you can taste it nicely in the batter before baking. (I think that batter alone would make a nice coffee cake, but that's for another day.) But I got barely a hint of it after baking, so don't let that scare you. The recipe also calls for strawberry jam to be swirled into the top. Between me and you, I wouldn't do that unless maybe you had freshly made jam at your fingertips. Store bought jam (IMHO) puts a damper on the fresh strawberry flavor of the rest of the bread.


Another delectable of this loaf is the slight crisp and crunch of the crust. That sugar adds a lovely texture as well as yummy-ness.

Funny thing is, just two people managed to make that single loaf of strawberry bread disappear in about 24 hours. B (obviously) agreed with me that it was so good -- Oh. My. Goodness good. So much so, that he made a second loaf with the second pound of strawberries.

Recipe after one more enticing photo...


O.M.G. Strawberry Bread

Adapted from Saveur kitchen assistant Farideh Sadeghin's recipe here.

Ingredients

  • 1 1/2 cups flour
  • 1/2 tsp baking powder
  • 1/2 tsp ground cinnamon
  • 1/4 tsp kosher salt
  • 1 cup sugar
  • 1/2 + 1/8 (or, 5/8) cup canola oil
  • 2 eggs
  • 2 cups strawberries, roughly chopped
  • 1/4 cup strawberry jam (optional)

Instructions

  1. Heat oven to 350°, and grease a 9x5 loaf pan.
  2. Whisk flour, baking powder, cinnamon, and salt in a large bowl.
  3. Whisk sugar, oil, and eggs in a separate bowl. Combine wet ingredients into dry ingredients. Stir in strawberries.
  4. Pour batter into pan. If using jam, just dollop across the top and swirl into batter.
  5. Bake until golden brown, about an hour (mine took 1 hr, 6 min). Let cool a bit before turning it out of the pan -- about 30 minutes.
Yield: 1 loaf


Shared at Simple Saturdays Blog Hop, Simply Natural Saturdays, Old-Fashioned Friday, From the Farm Blog Hop, Freedom Fridays, and Farmgirl Friday Blog Hop.

23 May 2014

Sweet Mountain Dew Bread

Since I've started making jams and butters, I decided to start looking into making my own sweet breads (yep, that's how I like to eat my jams and butters -- with more sugar). I also thought of it as a cost-cutting measure. Some of the breads I like to eat are crazy priced.

I'm not new to making bread; I've been getting paid to do it for about twenty years. It's not often something I do at home, though. Many, many years ago I owned a bread machine. We used it often enough, but when I got my all-time favorite kitchen appliance it seemed a little unnecessary so we got rid of it. What's my all-time favorite appliance? The Kitchen Aid mixer, of course!

My Kitchen Aid is one of the classics (that's really what they call it now). I've had it for about twelve years, and it still works wonderfully. I've thought about upgrading to one of the artisan mixers, but that would be filling a luxurious want more than a need. Maybe one day, but probably not as long as my classic continues to do the job well.

I guess the reason why I shared that with you is because of the recipe book I used for the sweet bread -- it's a collection of recipes for bread machines. (But I'm here to tell you, you don't have to have a bread machine to use the recipes!)

The recipe that follows is for an egg bread with slightly sweet overtones, using Mountain Dew instead of water. It's delicious with blueberry butter, and it makes a mean honey smoked turkey sandwich. (You can totally go with water if the idea of Mt. Dew in your bread makes you squeamish.)

Wet Ingredients

Ready to Bake

Enjoy!

Sweet Mountain Dew Bread

Adapted from Sweet Bread recipe, pg. 59, The All-New Ultimate Bread Machine Cookbook

Ingredients

  • 3/4 cup Mountain Dew
  • 1 extra-large egg
  • 1 extra-large egg yolk
  • 3 tbsp unsalted butter, cut up
  • 1 1/2 tsp salt
  • 3 tbsp sugar
  • 3 cups bread flour
  • 1 packet fast-rise yeast

Instructions

  1. Add dry ingredients to mixer. Next add the butter and incorporate. Then add the egg, egg yolk, and Mountain Dew. Mix until dough forms, cleans the bowl, and has proper development.
  2. Let dough rest for about an hour. Shape it into a loaf and place it in pan.
  3. Let dough proof in pan for about two hours.
  4. Bake in a 375° oven for about 25 minutes. Turn out of pan and let cool on rack.

Shared at From the Farm Blog Hop, Freedom Fridays, The HomeAcre Hop, Thriving Thursday, and All Things Thursday.


Disclosure: This post contains affiliate links, which means I may receive a very small commission if you click the link and buy something. This helps support my blogging activities, and the price you pay will be no different than if you arrived at the same destination through any other link. My opinions are my own, to be sure. If I link to a product and say I like it -- I truly like it! :-) Thanks for reading and following Stephlin's Mountain.

Related Posts Plugin for WordPress, Blogger...