27 May 2016

Vanilla Simple Syrup – Get More Out of Those Beans

vanilla-moreDo you make your own vanilla extract? I do, too.  Have some brewing right now.  (This is how I made it.)

Making vanilla extract is easy, cost effective, and I know for sure what's in it.  Even though I let the vanilla steep for weeks, even months, the used bean pods are still so fragrant when I remove them from the extract.  I hate to even throw those "scraps" away!

So I don't.  I put them to work for me again.

I'm sure a lot of you have heard of putting spent vanilla bean pods in sugar.  Sounds like a good idea, though I've never tried it.  I thought about it, but then decided to take a different route.  Instead, I made vanilla syrup.

It was so simple.  As in, simple syrup.  Gather equal parts of water and sugar.  (I used a cup of each.) Mix them together in a pot on the stove.  Throw in your spent vanilla bean pods.  Bring it all to a boil, and let it roll until the sugar is dissolved.  It won't take long.  Remove from heat, and let it all steep for a while.  I basically just let mine cool completely.  Maybe an hour.

Remove bean pods from your newly made vanilla syrup.  (I guess you can dispose of them now, unless you have a way to use them further.) Store syrup in a jar in the fridge.  Not sure how long it will last; been using mine for weeks.

My favorite way to use the vanilla syrup is over fruit.  Oh, is it good.  Makes humble fruit taste delectable.  I usually spoon it over sliced strawberries.  (And maybe, if I have it, add a dollop or two of whipped cream.) Just the other day, I poured lightly drizzled some sweet vanilla syrup over a bowl full of blueberries and diced apple. Mmmm…I could drool right now.

100_7254

I have also used it in place of vanilla extract.  I'm sort of "in between" brews right now.  My new batch could be used, but it would be better if I waited.  The vanilla syrup worked great.  Certainly not as strong as the real stuff, but was just fine in a pinch.

Let me share this with you, too.  This is an image of the underside of the lid I use to cap the jar of vanilla syrup.  I usually give the jar a shake before drizzling or taking a teaspoon.  Can you see all the vanilla? I was really surprised at how much still came out after those beans had been steeping for months,  making extract.  So glad I didn't waste it!

100_7258

Do you extend the life of your "spent" vanilla beans? How so? I'd love to hear your ideas and experiences.

Shared at Freedom Fridays, Simple & Sweet Fridays, Happiness is Homemade, Tuesdays with a Twist, Coffee and Conversation, Monday of Many Blessings, and Tasty Tuesdays.

From my mountaintop to yours!

13 May 2016

Summer Squash Macaroni and Cheese

100_5272Do what you can with what you have…and don't forget to take pictures.  Well, I got half of it right.  I didn't do so hot with the pictures part.

Does the word "picture" sound antiquated to you? It does to me.

Anyway. It was just me and the dogs for dinner one night.  I wanted something easy, hearty, comforting, and meat-free.  Easy, peasy, right? For someone who doesn't cook, not so much.  So I turned to an expert – Rachael Ray, and settled on her Boo's Butternut Squash Mac-n-Cheese recipe from 365: No Repeats.

I went to the store to get some frozen butternut squash.  The recipe actually calls for it initially in that state.  I didn't have time to roast one anyway, and to be honest, I didn't want to.  Unfortunately, there was no frozen butternut squash to be found in the store I chose.  So I went with what was available, yellow squash with onions (still of the frozen variety).

Got home and fumbled my way through the recipe, making little adjustments here and there, and finally got a finished product.

Y'all.  It was good! Real good.

100_6979

If I've piqued your curiosity, and you want to know more, here's what I did:

Summer Squash Macaroni and Cheese

100_6978Adapted from "Boo's Butternut Squash Mac-n-Cheese" by Rachael Ray in the 365: No Repeats cookbook.

Ingredients

  • coarse salt
  • 1/2 lb. penne pasta
  • 1 tbsp. extra-virgin olive oil
  • 2 tbsp. unsalted butter
  • 1 tbsp. dried thyme (or 2 tbsp. chopped fresh)
  • 3 tbsp. all-purpose flour
  • 1 (14-oz.) can chicken broth
  • 1 bag frozen yellow squash with onions (about 12 oz.), defrosted 
  • 1 cup half and half
  • 2 cups (8 oz.) grated sharp Cheddar cheese
  • 1/2 cup grated Parmesan-Romano
  • freshly ground black pepper, to taste

Instructions

  1. Boil pasta in salted water according to package directions.
  2. While the pasta cooks, heat a medium heavy-bottomed pot over medium heat. Add the extra-virgin olive oil and butter. When the butter melts into the oil, add the thyme and cook for a minute or 2. Add the flour and cook for a minute or 2 more. Whisk in the broth, then add the squash and onion mixture. Cook until warmed through. [At this point, I broke up the squash into smaller pieces. Nothing too difficult, just allowed it to go a bit and begin to break down.]
  3. Stir in the half and half and bring the sauce to a bubble. Stir in the cheeses in a figure-eight motion and season the completed sauce with salt and pepper, adjusting for taste.
  4. Drain the cooked pasta well and combine with the sauce.

Yield: 5+ servings

Hope you like it! From my mountaintop to yours.

Shared at From the Farm, Freedom Fridays, Simple & Sweet Fridays, Chain "Linky" Climb, The Art of Homemaking Mondays, and Tasty Tuesdays.

Disclosure: This post contains affiliate links, which means I may receive a very small commission if you click a link and buy something. This helps support my mountain homestead dream as well as my blogging activities, and the price you pay will be no different than if you arrived at the same destination through any other link. My opinions are my own, to be sure. If I link to a product and say I like it -- I truly like it! Thanks for reading, following, and supporting Stephlin's Mountain.

09 May 2016

My 2¢ on Dehydrating Apples: a How-To with 7 Tips

100_6118Making apple chips, or dried apples, is super easy to do at home with a dehydrator.  (I use a Nesco Snackmaster.) Here are the basic steps:
  1. Select firm apples with as little bruising as possible.
  2. Wash and core the apples.
  3. Slice apples thinly and as evenly as possible (about 1/4-inch).
  4. Places slices in lemon juice and water mixture.  A 1/4 cup juice to a quart of water is a good ratio.  This helps to deter browning.
  5. Season (with cinnamon, for example) if desired.  Place slices on dehydrator trays in such a way that air can circulate around them.
  6. Dry at 140°F for an average of 12 hours.
100_6125What I learned after my first attempt at drying apples at home:
  • It's easy! Don't stress over every little step.  Forget the lemon juice? That's ok.  Your slices aren't perfectly even? That's ok.  Some of your slices are touching on the dehydrator trays? That's ok! You should still end up with a nice finished product.
  • Be picky about your apples.  If you get a ho-hum flavored apple from the grocery store and dry it, it's still going to be a ho-hum flavored apple.  We now live about 3 miles from an apple orchard that's been around for 70 years.  Can you guess where my next batch to dry is coming from?
  • The skin is pretty tough after drying.  Next time, I'm going to peel my apples.
  • The lemon juice and water mixture works.  I had no browning of the apples using this method.  Having said that, there are plenty of people who skip this step.  Try some both ways.  If it doesn't make a big enough difference for you, you'll save time in future batches.
  • I used a Granny Smith (tart) type of apple.  Didn't care for cinnamon on it.  Might want to use a sweeter apple in the future.
  • Be flexible with your drying times.  External factors will play a role in how long it takes to dry your apples.  So don't be hard and fast about it.  Check on the drying progress from time to time.  You want a pliable and flexible apple slice with no signs of moisture.  If you are planning on storing them long term, over-drying is better than under-drying.
  • I store my dried apples in pint-sized mason jars.  The ones I made 10 months ago have not lost any flavor -- still delicious!

100_6131

Tuesdays with a Twist Featured

Shared at The Art of Homemaking Mondays, Thank Goodness It's Monday, Inspiration Monday, Create Link Inspire, Tuesdays with a Twist, The Homemaking Party, Thrifty Thursday, From the Farm, and Chain "Linky" Climb.


From my mountaintop to yours!

Disclosure: This post contains affiliate links, which means I may receive a very small commission if you click a link and buy something. This helps support my mountain homestead dream as well as my blogging activities, and the price you pay will be no different than if you arrived at the same destination through any other link. My opinions are my own, to be sure. If I link to a product and say I like it -- I truly like it! Thanks for reading, following, and supporting Stephlin's Mountain.

18 April 2016

Easy, No-Bake Energy Bars

Easy, No-Bake Energy BarsWe've been doing a pretty good job with meals lately.  We've managed to cut our food waste way down by only making what we will eat and / or eating leftovers for lunch, as well as not being afraid to utilize the freezer for future consumption.  Really pretty simple stuff, but stuff I didn't take time to do before.  Here recently, however, I've been missing something.  Snacks!

I haven't been buying a lot of junk finger foods since we moved.  That certainly doesn't mean I haven't been tempted in the grocery store.  Even stopped and gave some things a hard look.  But I've done a pretty darn good job of resisting.  Think money.  Think chemicals.  Think health! (It's not 100% effective, mind you, but does do the trick most of the time.)

My point is this:  I realized that the body's desire to snack is rarely there.  As long as I eat a bit of breakfast and a lunch, I'm usually good 'til dinner.  Which must mean, at least for me, if it's in the pantry (cupboard, fridge, whatever) I. will. eat. it.

But, ya know, cravings do come.  And they've been swirling around me the last several days.  I usually have some sort of fruit around, but I eat it with breakfast or lunch.  So I didn't want that.  I did make myself some popcorn one day, and that was good.  But I still wasn't satisfied, and I'm sure you know what the problem was – I wanted something "sweet."

So finally I went through my Pinterest boards to find a homemade granola bar recipe to try.  One of those things that's been on the to-do list for some time, but haven't felt the urgency until now.

I settled on some Oatmeal Energy Clusters because I already had all the ingredients, save one.  The basic recipe is from The Chew's Clinton Kelly.  I just made one addition.  You'll need:
  • 2 cups quick oats
  • 2 tbsp chia and/or flax seed mixture (I use Decadent Blend Chia & Flax Seed with Coconut & Cocoa)
  • 1/2 cup chocolate chips (I used minis)
  • 2/3 cup shredded coconut (try to get unsweetened)
  • 1/2 cup natural peanut butter
  • 1/3 cup raw honey
  • 1 tsp vanilla extract
  • 1/4 tsp salt
Put everything in a big bowl, in the order typed above.  Mix it well.  I had to do it with my hands to really get it together.  If your mixture is stubborn, try adding some more peanut butter and/or honey.  You could also warm the honey and peanut butter together, to get more of a liquid.  Then add to the other ingredients.  But I was too lazy to go through all that.  Here we are mid-mix.  I forgot to snap an image before starting.

Easy, No-Bake Energy Bars Mixture

Now.  If you follow Clinton Kelly's recipe, you would put the mixture in the fridge for a while, pull it out and roll pieces (roughly 1-inch in size) into balls.

I knew that would not work for me.  Popping a 1-inch "cluster" in my mouth would not result in a craving satisfied.  I know that's my brain talking, but it doesn't matter.  I need more than one bite to my snack.  If you're like me, you'll want to make bars.

Take something akin to a 9"x9" pan and line it with parchment paper.  (I used a toaster oven baking tray that measures 10"x8".) Press the mixture out evenly to the size of the pan.  You could add another piece of parchment paper and use a rolling pin, if it'll fit.  But, again, I just used my hands.

Easy, No-Bake Energy Bars Pressed In Pan

Lift the bottom parchment out of the pan and square off your gonna-be bars, if necessary.  The pan was really just a guide.  Then let everything dry for at least an hour.

Easy, No-Bake Energy Bars Prior To Cutting

Now it's time to cut the bars.  My pizza cutter worked well.  I made a single cut down the middle long-ways.  Then another cut down the center the opposite way.  Then each half (which is quartered) into thirds.  Does that even make sense? Lord, help me.  Let's just say I got a dozen bars.  Each one measured approximately 4-inches by 1 1/2-inches.  The image below only shows eleven bars because I ate one already! (She sheepishly grins.)

Easy, No-Bake Energy Bars Cut

Another good thing about these bars, in addition to requiring more than one bite to eat, is they are relatively healthy.  They're full of fiber, protein, potassium, magnesium, and antioxidants, including Vitamin E.  Chia and flax seeds also add Omega-3.  You can also customize them even more.  Maybe add dried fruits or nuts.  Go crazy with it!

These bars should last about a week in a sealed container on the counter.  You could put them in the fridge to extend the shelf life a bit.  Give them a try! Real food with no added chemicals is a good, good thing.  From my mountaintop to yours.

Easy, No-Bake Energy Bars Ready To Eat

Shared at Art of Home-Making Mondays, Homemade Mondays, The Homemaking Party, Thrifty Thursday, Happiness is Homemade, Coffee and Conversation, Wonderful Wednesday, From the Farm, and Tuesdays with a Twist.


Disclosure: This post contains affiliate links, which means I may receive a very small commission if you click a link and buy something. This helps support my mountain homestead dream as well as my blogging activities, and the price you pay will be no different than if you arrived at the same destination through any other link. My opinions are my own, to be sure. If I link to a product and say I like it -- I truly like it! Thanks for reading, following, and supporting Stephlin's Mountain.

19 March 2016

Snake! And it's Almost Spring. (Homesteading Newbie Diary)

100_7015Are you ready? Tomorrow is the first day of Spring.  And the weather people are calling for lows of 38, 29, and 33 degrees over the next 72 hours.  Go figure.

Did you know this is the earliest arrival of Spring since 1896? Me either.  File that under things that make you go hmmm…

Well, I think I had a pretty productive week.  I had two big items to get going.  One was completed, and the other has been started.  Yay, me!

I've been reading through the Old Testament.  All told, I read chapters 21-32 in the Book of Numbers this past week.  Two quick thoughts:  those wilderness wanderers whined a lot, and sometimes I find the Old Testament disturbing.

We were able to go on long walks with the dogs a couple days.  Once along a creek by our place, and once around the lake just a few miles away.  Our youngest, Kody, dove in the lake without a thought all the way up to his chest.  Then quickly decided it was too cold and got out just as fast.  The older one, Bear, who is more cautious and measured in his decision making, decided not to go in at all.  It was beautiful scenery, and we all had a good time.  So much so, one of us was all tuckered out afterward.

2016-03-16

Think I mentioned this in the Cabbage Rolls Deconstructed post.  I'll pop it in here, too, since it is part of the weekly recap.  I created a facebook page for Stephlin's Mountain.  If you like to follow blogs there, stop by and give the page a like.  'Preciate it!

So! Sowed any seeds lately? I did! Rosa Bianca eggplant, small cherry tomatoes, chocolate bell peppers, Poblano peppers, Fresno chili peppers, Thai basil, and Tom Thumb lettuce.  I have more to do, but that's a start! B also got the small greenhouse put together for me, and all the pots are out.  Ready and waiting! I was going to sow some rainbow swiss chard seeds, but thought I'd wait until after the possible freeze over the next few days.  I also read that cilantro doesn't like to be transplanted.  That right?

2016-03-19

It took three more days' work, but I finally finished the women's history post I mentioned to you last week.  The subject is Myrtle Terry Lawrence, organizer for the Southern Tenant Farmers Union.  It's here at the Southern Graves blog, if you're interested.

One of my big goals for next week is to get some water kefir started.  Anyone else made it before? Any tips?

Made a loaf of sweet Mountain Dew bread.  Not a good step forward in healthy eating, per se, but it's a recipe I'm comfortable with.  And I did have to make some adjustments in the actual baking process.  This is my first experience with baking bread in a gas oven.  Plus, said oven is smaller than a usual one.  So even though I made my regular loaf size, I couldn't proof it as long as I would normally, or it would have hit the top of the oven.  I double panned it, but the bottom heat was still too much for my liking.  And lastly, I needed an egg wash for it to brown…It was still yummy, though!

We might have discovered a wild blueberry bush in the back corner of our lot.  Fingers crossed!

Made iced sugar cookie bars and watched In the Heart of the Sea.  Good dessert.  Good movie.

Last, but not least by any stretch of the imagination…SNAKE! Bear saw it first.  I walked by it at least twice before turning around to see Bear on his hind legs sniffing the air.  Then he dropped back to all fours and backed up a bit.  I followed his gaze to see a nice creepy black (rat?) snake slithering in between the railroad ties bordering our lot.  By the time I got the dogs inside and grabbed the camera, it was out of sight.  Even if I'm not exactly right in my naming of the type of snake, I'm still fairly confident it was not a poisonous one.  But still! This is the one thing I've been fearful of since moving.  I stress so much over my dogs, and it's not like I'm ever excited to see a snake.  Ugh.  Know of any natural snake repellant? (I'm only half kidding.)

Well, you're all caught up! What homestead happenings went on at your place last week?

Shared at Freedom Fridays, Simple Saturdays, Happiness is Homemade, and The Homemaking Party.


From my mountaintop to yours,

13 March 2016

5 Ways to Use Ready to Eat (Now!) Bananas

Ever find yourself with more bananas than you can eat before they start to brown? Ever wanted to take advantage of a good sale on bananas, but weren't sure how you'd use them all? Here are 5+ ideas for those ready-to-eat (now!) bananas.

Blueberry Banana Donuts

1. Banana Bread

100_6936The recipe I used combined all-purpose and whole wheat flour.  I didn't think it was sweet enough (for me) at first, but the more I munched the more I liked what I was munching.  It was a good platform for blueberry-lemon-honey fruit spread, too.  Here's the super easy recipe:

  • 8 tbsp (1 stick) butter, at room temp.
  • 3/4 cup sugar
  • 2 eggs
  • 1 cup all-purpose flour
  • 1 tsp baking soda
  • 1/2 tsp salt
  • 1 cup whole wheat flour*
  • 3 large ripe bananas, mashed
  • 1 tsp vanilla (how I make it)

Preheat oven to 350 degrees, grease 9x5x3" bread pan.  Cream butter and sugar until light and fluffy (I used a KitchenAid Classic stand mixer).  Add eggs one at a time, beating well after each addition.  Add all-purpose flour, baking soda, salt, and whole wheat flour to cream mixture, mixing a bit after each addition.  Mix well.  Fold in bananas and vanilla.  Pour mixture into pan, bake 50 to 60 min. or until cake tester comes out clean - cool in pan 10 minutes, on rack.  Makes one loaf.

*I mill my wheat flour using a WonderMill.  In this recipe I used what I had on hand, which was flour from organic hard white wheat berries.


2.  Banana Jam
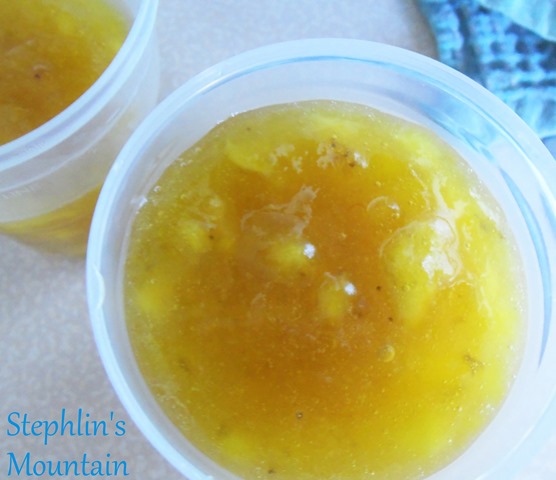
100_6941I had never heard of banana jam before reading this post at Confessions of an Overworked Mom.  It sounded delicious, and it's something that may be preserved with water bath canning.  I gave it a go and was not disappointed.  It's swe-eet, though.  I might lower the sugar amount next time, cuz there will be a next time.  Here's the recipe (adapted from Ellen's, linked above):

  • 2 cups mashed bananas (about 4-5)
  • 2 cups sugar
  • 2 tbsp lemon juice

Put all ingredients in a pan (I used a 12-inch nonstick skillet) and simmer on medium-low heat, stirring occasionally, until bananas are broken down to your liking. I like some texture, but still want it to spread easily.  Know what I mean?

Now let the jam roll at a full boil 5-6 minutes.  Everything will reduce and thicken.  Ladle jam into jar or jars.  I got a bit over 12 oz.

3.  Chocolate, Peanut Butter, & Banana Smoothie

I've been making this off and on for more than a year.  It's got enough good for you stuff to be a nice breakfast or snack.  Yet it's got enough chocolate flavor that I had it for dessert just last night!

100_6980

Click here for the Chocolate, Peanut Butter & Banana Smoothie recipe!

4.  Blueberry Banana Cake Donuts

These came about when I planned to make some blueberry donuts and at the last minute decided to throw in an overripe banana.  Good stuff happened there – moist, tender, blueberry freshness, with a hint of banana.

100_4808

Click here for the Blueberry Banana Cake Donuts recipe!

5.  Strawberry Banana Soup

100_6944Ok.  I know "soup" is a poor choice for this often made traditional dessert.  You could think of it as a sauce.  If you want to make an angel food cake a little more special, add this strawberry banana mixture.  It wouldn't hurt to top your ice cream with it, either.

All you do is slice up a bunch of strawberries and bananas.  Toss them in a bowl with some sugar and fruit juice.  Just enough of each to bring out the natural juice of the strawberries.  It really is yummy all by itself.

There you have it! 5 ways to use some ready-to-eat (now!) bananas…But I did type 5 plus in the opening paragraph, didn't I? Well, don't forget banana pudding.  The best way is to go all out and make the custard from scratch, of course, but I was short on time the first night we procured the bananas.  So semi-homemade it was.

Get some banana (or vanilla) pudding mix and whip it up.  Get a bowl and layer the following:  vanilla wafers, pudding, and sliced bananas.  Then repeat until the bowl is full or your ingredients are gone.  You have a pretty nice trifle style dessert.

And last, but by no means least, I really enjoy sliced bananas in my breakfast cereal.  Sounds obvious, but you'd be surprised how many times I forget to take this simple step to enrich my morning when I'm in a hurry.

Now the next time you see those marked down several pounds bag of bananas in the produce department, have no fear.  You have at least 5 (or 7) ways to use them!

Collages

Shared at Clever Chicks Blog Hop, Simple & Sweet Fridays, Freedom Fridays, The Homemaking Party, Tuesdays Rubies, Happiness is Homemade, and Tuesdays with a Twist.

Disclosure: This post contains affiliate links, which means I may receive a very small commission if you click a link and buy something. This helps support my mountain homestead dream as well as my blogging activities, and the price you pay will be no different than if you arrived at the same destination through any other link. My opinions are my own, to be sure. If I link to a product and say I like it -- I truly like it! Thanks for reading, following, and supporting Stephlin's Mountain.

From my mountaintop to yours!

21 July 2015

Feeling Overwhelmed? Make Your Own Mouthwash!

It happened again. It crept up on me, but still. It happened. That feeling of being overwhelmed. It overtook me. Had me almost paralyzed!

There's so much to do. And so much I want to do, but can't yet afford, whether it be for lack of time or money. But it's all still in the forefront of my brain.

And it doesn't help to be planning a move around the first of the year. Because there are some things that are just not feasible to be doing right now. But that doesn't take the project(s) off my to-do list, necessarily.

I've tried making separate lists. Dividing things up into different time-frames. The problem is the "master" list remains in my head.

When I get that feeling of being overwhelmed, I tend to turn to information. Books, blogs, YouTube videos. I rationalize that I am researching and learning -- and that is a valid truth -- but for me it's just procrastinating. Because I don't know where to begin. Or maybe because I don't know exactly how I should approach a certain project. An overwhelmed perfectionist rarely accomplishes anything, I say. And that would be me of late.

Then I came across something that helped me a lot. It got me off my butt. I read it on the Art of Simple blog. (Which proves researching and learning from books, blogs, and YouTube is worthwhile, but I digress.)

A quote from Christian missionary, author, and speaker Elisabeth Elliot:


I read the quote and thought, "Wow. That simple idea makes so much sense."

While still pondering the quote, I walked into the bathroom and (eventually) opened a cabinet to stare at an empty mouthwash bottle. Something I've been meaning to make for myself for a time. But instead of adding the task to a mental to-do list, it became the thing in front of me. So I did it. (I know you're proud, but no applause is necessary.)

How simple and sweet is that? I knocked something off my to-do list, and made chemical free mouthwash for pennies.

It took such little time and only three ingredients.  The recipe I used came from Frugally Sustainable. (Score another one for blogs.) She had a few to choose from, and this was a basic: One cup filtered water, one teaspoon baking soda, and 3 drops organic peppermint essential oil. Throw it all in a half-pint mason jar, apply lid, and give it a shake. Thirty minutes after swishing some around my mouth, I still feel fresh.


Think you might want to give it a try? Well, "do the thing in front of you"...or pin it for later! ;-)


P.S. I did not know of Elisabeth Elliot before reading the quote attributed to her. I have since learned she passed away a little over a month ago, at the age of 88. May she rest in peace.


Shared at The {Not Just} Homemaking Party, Making a Home - Homemaking Linky, Big Family Frugal Weekend Link-Up, Wildcrafting Wednesday, Simple Life Sunday, and Simply Natural Saturday.


Disclosure: This post contains an affiliate link, which means I may receive a very small commission if you click the link and buy something. This helps support my mountain homestead dream as well as my blogging activities, and the price you pay will be no different than if you arrived at the same destination through any other link. My opinions are my own, to be sure. If I link to a product and say I like it -- I truly like it! :-) Thanks for reading, following, and supporting Stephlin's Mountain.

Related Posts Plugin for WordPress, Blogger...