Showing posts with label cake. Show all posts

05 May 2015

Strawberry Banana Yogurt Cake ~ Baked in a Toaster Oven

Life without an oven stinks. Especially when you love to bake. And since our beloved Destiny lacks the appliance, I haven't been able to bake in over two months! Well, I could stand for that no more. So we bought one.

A toaster oven, that is. ;-)

I had a bit of cash left on an Amazon gift card so, while it's not exactly high dollar, we were able to get a good one: a Black & Decker Countertop Convection Toaster Oven was delivered just a few days ago.

I was able to sample some recently received strawberries at work the day before yesterday. They were Delicious! I was actually surprised at how tasty they were, and made sure to buy some on the way out. I already had a couple of bananas at home, and had pinned the base recipe for this cake not long ago. It was a perfect storm, it seems.


You only need one bowl to mix this cake. A plus for those with limited space! The base recipe does not call for bananas, but I couldn't resist the combination. I simply folded in slices at the end of mixing the cake batter. And I think I made my dollops of strawberry jam a bit too big. Next time, I'll be more inclined to swirl it in to the top.


Here's proof I baked it in a toaster oven! :-)


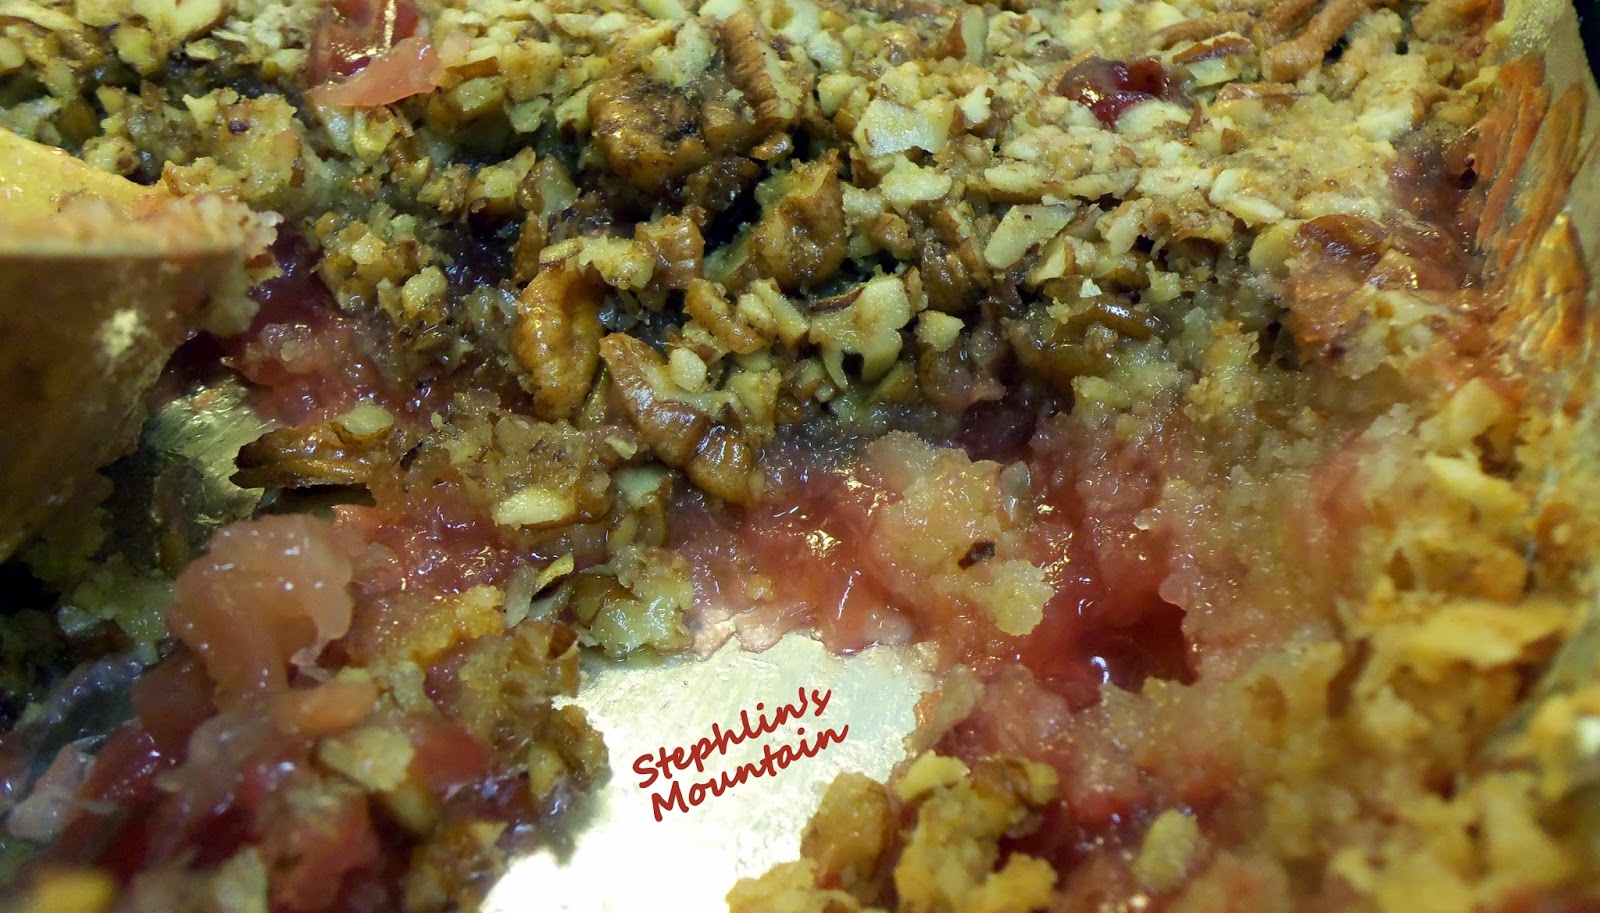
And the yummy result. It's somewhat similar to the best strawberry bread ever I posted about here. Greek yogurt makes it super moist. Recipe follows.


Strawberry Banana Yogurt Cake

Strawberry Banana Yogurt Cake
Adapted from Betty Crocker recipe here.

Ingredients

  • 2 containers (5.3 oz each) Greek blended strawberry yogurt
  • 1 1/2 cups granulated sugar
  • 3/4 cup extra virgin organic coconut oil (can also use vegetable or canola)
  • 2 tsp vanilla (make your own!)
  • 3 eggs
  • 2 1/4 cups all-purpose flour
  • 1 tbsp baking powder
  • 1/2 cup strawberry jam
  • 1 1/4 cups quartered fresh strawberries (grow your own!)
  • 2 tsp granulated sugar
  • powdered sugar, for garnish (optional)
  • 2 bananas, sliced (optional)

Instructions

  1. Preheat oven (toaster or regular) to 350°F. Grease and flour a 13x9-inch (I used a 10X12-inch) pan.
  2. In a large bowl, stir together yogurt, 1 1/2 cups granulated sugar, oil of choice, and vanilla until well combined. Mix in eggs, one at a time, until well blended. Add flour and baking powder; beat with wooden spoon until smooth. Fold in sliced bananas, if using.
  3. Pour batter into pan, spreading evenly. Dollop strawberry jam on top of cake batter. Sprinkle with strawberries and remaining 2 tsp granulated sugar.
  4. Bake 45 to 50 minutes or until toothpick inserted in center comes out clean. (Mine took 45 minutes in the toaster oven.) Cool 20 - 30 minutes. Sprinkle with powdered sugar, if so desired.
Yield: 12 servings

P.S. I hope you'll forgive me rocking the paper plates and foil pan. Not very crunchy or homestead-y, I know. Sometimes ya gotta do what ya gotta do. Ya know? I'll make up for it when we get moved, I promise. :-)


Shared at Making a Home - Homemaking Linky, Tasty Tuesday, Teach Me Tuesday, Tickle My Tastebuds, Tuesdays with a Twist, and Homemade Mondays.


Disclosure: This post contains an affiliate link, which means I may receive a very small commission if you click the link and buy something. This helps support my mountain homestead dream as well as my blogging activities, and the price you pay will be no different than if you arrived at the same destination through any other link. My opinions are my own, to be sure. If I link to a product and say I like it -- I truly like it! :-) Thanks for reading, following, and supporting Stephlin's Mountain.

26 June 2014

Delectable Dump Cake (Is it a Southern Thing?)

I don't know why, but I equate Dump Cake with the South. So imagine my shock and surprise when I discovered my southern born B had never heard of it, let alone tasted it.

I'm not quite sure what brought on the recent desire for Dump Cake to begin with. I remember reading a post about it online, then a few days later it was mentioned in my vicinity off-line. I guess I took that as a sign from above. Must. Make. Dump. Cake.

Dump cake also brings back memories.  Grandma Logue used to make it for us, and I bet it had been twenty years or more since my last bite.


Dump Cake as it is traditionally prepared, unfortunately, is not good for you. Don't worry, I didn't let that tidbit stop me. Yet I was feeling extra bummed about "dumping" a box of chemical-laden cake mix on top of my canned fruit. So I searched around for a recipe, and made my own. There! Now I feel a little better. (I really wanted to make my own cherry pie filling, but I just couldn't bring myself to pay the price for fresh cherries. I know they're going to be on sale soon, so I've put canning some for next time on my to-do list!)


The topping also includes a couple of cups of chopped pecans. I was able to use my chopping gadget to make quick work of some pecan halves my grandmother gave us. In fact, she's been supplying us with pecans for years.

I remember, when I was a kid, having to go to the tree in her backyard and pick them up off the ground. And I remember her and Grandpa sitting in the living room with a bowl full each, cracking them open.


Ready for the recipe, yet? Don't worry. I won't leave you hanging in suspense much longer.  ;-)


Delectable Dump Cake

Delectable Dump Cake

Ingredients

  • 1 (21 oz.) can cherry pie filling
  • 1 (20 oz.) can crushed pineapple, with juice
  • 2 full cups homemade yellow cake mix (or 1 box store bought)
  • 2 sticks unsalted butter, melted
  • 1 tbsp pure vanilla extract (make your own!)
  • 2 cups chopped pecans

Instructions

  1. Preheat oven to 350 degrees. Coat 9x13 pan with non-stick spray.
  2. Dump pineapple and cherry pie filling into pan. Swirl together and spread evenly over bottom of pan.
  3. Dump and spread yellow cake mix evenly over top of fruit.
  4. Dump and spread chopped pecans evenly over top of cake mix.
  5. Mix vanilla in with melted butter, and pour evenly over top of pecans.
  6. Bake for 45 minutes to 1 hour. (Mine took 55 minutes.)

Shared at All Things Thursday, Fabulously Frugal Thursday, Four Seasons Blog Hop, Thrifty Thursday, Thriving Thursday, and some of these other fine hops.


I was Featured!

25 June 2014

Make Your Own Cake Mix in a Box

Mine ended up being cake mix in a freezer bag, but I digress.

All I wanted to do was make a Dump Cake. In my ever constant (never ending?) attempt to eat more real food and less chemicals, I was a bit frustrated with the "dump a box of cake mix over the top" step in the recipe. Of course, that's not the only recipe like that. There are plenty that include "1 box yellow cake mix" as a single ingredient.

So off to Google I go. While I eventually found the recipe that follows on several blogs, I will credit the first place I saw it -- Brown Eyed Baker. Thankfully, I can now add boxed cake mix to my no-need-to-buy list!

Per the instructions, I used my trusty food processor to easily whip the mix together.

Mixed dry ingredients.

Cubed butter tossed in flour mixture, and pure vanilla extract added.

DONE!

Here's the recipe. I'll be back later tomorrow with that Dump Cake!

Make Your Own Cake Mix

First seen on Brown Eyed Baker.

For a cake recipe using this mix, visit Mel's Kitchen Cafe.

Ingredients

  • 2 cups sugar
  • 1 1/2 cups all-purpose flour
  • 1 1/2 cups cake flour
  • 1/2 cup milk powder
  • 1 tbsp baking powder
  • 1 tsp salt
  • 2 sticks unsalted butter, cut into 1/2 in. cubes, chilled
  • 1 tsp pure vanilla extract

Instructions

  1. Add all dry ingredients to bowl of food processor. Mix for about 15 seconds.
  2. Add butter cubes and slightly toss in flour mixture, making sure all are coated. Add vanilla.
  3. Process with 10-15 one-second pulses, until mixture is fine and crumbly -- like boxed cake mix!
  4. Store in freezer bag or container in freezer for up to 2 months. No need to "thaw". Simply use straight from freezer in any recipe calling for cake mix.

Yield: 5+ cups


Shared at Life Lately Link Up, Homemaking Party, Wake Up Wednesday, Backyard Farming Connection Hop, Lovely Ladies Linky, Mountain Woman Rendezvous, Wonderful Wednesday Blog Hop, and some of these fine hops.


Disclosure: This post contains affiliate links, which means I may receive a very small commission if you click the link and buy something. This helps support my mountain homestead dream as well as my blogging activities, and the price you pay will be no different than if you arrived at the same destination through any other link. My opinions are my own, to be sure. If I link to a product and say I like it -- I truly like it! :-) Thanks for reading and following Stephlin's Mountain.

Related Posts Plugin for WordPress, Blogger...