Showing posts with label cinnamon. Show all posts

29 October 2016

Crockpot Apple Butter – 'Tis the Season!

100_8199There won't be a lot of typing for this post, since I'll be letting the photos do the talking for me…

Folks, now's the time! The apples are at their peak, in both freshness and price, and the fall flavors are calling your name.  If your crockpot doesn't already have a spot on the counter, shove some stuff aside and bring her out.

This apple butter recipe is so stinkin' easy! The crockpot does most of the work.  All you have to do is prepare the apples, watch, stir, and wait.  And, believe me, waiting will be the hardest part.

100_8201

Peeling and slicing the apples is a little annoying, I'll admit, but even with just my humble apple wedger and corer, it wasn't too bad.  If you have a peeler-slicer-corer, you are way ahead in the game.  But no matter what you use, the time it takes to get these slices of sweetness in the crockpot is so worth it.

100_8202

Just a few autumn spices is all you need to add to your apples.  Cinnamon and nutmeg just scream fall, don't they?

100_8204

100_8203

I highly recommend sitting your slow cooker next to a window with a wondrous view of the fall colors outside.  It adds to the mood the aromatherapy coming from the crockpot creates.

100_8213

When it's all done, ladle the thick, dark, sweet goodness into jars.  You can freeze or can them for later.  But don't forget to leave some out for slathering on some biscuits right away! And if you're so inclined, put some back for Christmas gifts.  (Recipe after one more enticing image.)

100_8218

Crockpot Apple Butter Recipe
Adapted from recipe at Simply Canning.

100_8219*I used a 5-quart slow cooker, filled to the brim with sliced apples.  Adjust your additives, based on the size of your crockpot.

Ingredients

  • apples – peeled, cored, and sliced (I used fresh from the orchard, Fuji apples; any on the sweet side variety will work)
  • 1 – 1 1/2 cups white granulated sugar
  • 1 tsp cinnamon
  • 1/4 tsp freshly ground nutmeg
  • 1/4 tsp kosher salt

Directions

Peel, core, and slice apples – enough to completely fill your crockpot.

Mix together sugar, cinnamon, nutmeg, and salt in a separate bowl.  Pour over top of apples.

Cover and cook on low for 12 – 24 hours.  (I know that's a huge gap in time, but it really depends on how juicy your apples are, and how low your crockpot cooks.) Stir occasionally.  Once the apples have broken down, you can take the lid off or leave it off-center so steam can escape.  Still stir occasionally, but now use a whisk.

As the hours slip by, the apple butter will thicken and become a deep, dark color.  You'll know it's done when any "watery-ness" has been absorbed or escaped.  Turn off heat when the apple butter is at your desired consistency.

[Note:  I know it's tempting to crank the temperature up to high to speed up the cooking process.  But be careful! The apple butter could easily scorch on the bottom, and it most certainly will splatter as it thickens.]

Your apple butter will last about a month in the refrigerator.  You can also freeze it for up to six months, or can it for your pantry with a 10 minute processing time (pints and half-pints) in a boiling water bath.  Just so you have an idea how far it cooks down, my five quarts of sliced apples gave me a little over 6 half-pints of butter.

Shared at Simple Saturdays, Simple & Sweet Fridays, Happiness is Homemade, and Tasty Tuesdays.

Disclosure: This post contains affiliate links, which means I may receive a very small commission if you click a link and buy something. This helps pay for the RV, supports our mountain homestead dream of owning land, as well as my blogging activities, and makes the dogs' tails wag.  Hopefully, the purchase benefits you, too!  The price you pay will be no different than if you arrived at the same destination through any other link. My opinions are my own, to be sure. If I link to a product and say I like it -- I truly like it! Thanks for reading, following, and supporting Stephlin's Mountain.

From my buttery mountaintop to yours!

11 September 2014

Vanilla Spiced Zucchini Batter Bread

Tonight's dinner is corn and poblano lasagna. Zucchini is a required ingredient, so before B got in the kitchen to tackle the prep for our evening meal, I snuck in and used what he didn't need to make some bread!

Before I share the recipe for this yumminess, may I ask you a question? Is the term "batter bread" redundant in the instance of the title of this post?

Maybe it's because I bake for a living, or maybe it's because I'm weird (I'll cop to either), but I always differentiate between a batter bread -- or quick bread, if you prefer -- and a traditional dough bread (with yeast).

B comes in the kitchen to ask what I'm making. My reply is, "Zucchini batter bread." He proceeds to tell me saying batter bread is unnecessary. Everyone knows zucchini bread is made with a batter. "Like banana nut bread," he says. I'm quite sure I responded with a you-have-no-idea-what-you're-talking-about look. But I simply stated, "Well, OK. But don't expect me to change how I say it based on this conversation." -- Thoughts?


The base recipe I used comes from Paula Deen. I did add one ingredient. (I just adore vanilla!) And since I make my own extract, I have the pure stuff right at my fingertips. It smells divine, and I love to see the brown vanilla bean flecks in the mixture.


Doesn't that look delicious? The loaf isn't overly sweet, in my opinion. A slice of this zucchini (batter!) bread would make a nice breakfast, snack, or dessert.  Just don't forget: everything's better with a pat of butter!

Vanilla Spiced Zucchini Batter Bread

Based on Paula Deen's recipe here, scaled down to make a single loaf.

Ingredients

  • 1 1/2 + 1/8 cups all-purpose flour (or, 1 5/8 cups)
  • 3/4 tsp salt
  • 1/2 tsp ground nutmeg
  • 1 tsp baking soda
  • 1/2 tsp ground cinnamon
  • 1 1/2 cups sugar
  • 1/2 cup vegetable oil
  • 2 eggs, beaten
  • 3 tbsp water
  • 2 tsp pure vanilla extract (make your own!)
  • 1 cup grated zucchini
  • 1/2 tsp lemon juice
  • 1/2 cup chopped pecans

Instructions

  1. Preheat oven to 350 degrees.
  2. In a large bowl, combine flour, salt, nutmeg, baking soda, cinnamon, and sugar.
  3. In a separate bowl, combine vanilla, vegetable oil, eggs, water, zucchini, and lemon juice.
  4. Mix wet ingredients into dry. Fold in pecans. Pour batter into a greased standard loaf pan (I used an 8" x 3" pan).
  5. Bake 50 minutes to 1 hour, using the toothpick test to check for doneness. (Mine was done in 54 minutes.)

Yield: 1 standard loaf


Shared at All Things Thursday, Fabulously Frugal Thursday, The HomeAcre Hop, Simple Lives Thursday, Thrifty Thursday, Thriving Thursday, and some of these fine hops.


26 July 2014

Cinnamon Bread. Quick and Simple.

I love quick breads. Mix the batter, pour it in a pan, pop it in the oven to bake. That's it. No long, drawn out process required.

A while back I had a craving for cinnamon bread. I was thinking of a traditional loaf with yeast and all, but was too lazy to go through the motions necessary for my desired result. Ever been there? Yep. Me, too. Quick bread to the rescue!

I found a recipe to try at Allrecipes.com, gave it a go, and was happy I did. It's not the prettiest loaf I've ever seen, but it sure is yummy. There's a nice sweet crust on top, and the cinnamon flavor can be tasted throughout. Since the "swirl" technique is used, I wasn't sure that would be achieved -- glad I was wrong. Craving fulfilled.

Want another peek?


Go ahead.  Get your drool on.  I won't tell.


OK.  You've been (fairly) patient.  Recipe after one more.


Simple Cinnamon Quick Bread

Submitted to Allrecipes.com by bettina.

Original recipe advises to wrap finished (and cooled) loaf in foil and let sit overnight before slicing. I totally did not do this. (Who could wait? I had a craving, remember?) But I'm quite sure the slices would have looked prettier had I followed this direction. :-)

Ingredients

  • 1/3 cup + 1 cup granulated white sugar
  • 2 tsp ground cinnamon
  • 2 cups all-purpose flour
  • 1 tbsp baking powder
  • 1/2 tsp salt
  • 1 egg, beaten
  • 1 cup milk
  • 1/3 cup vegetable oil

Instructions

  1. Preheat oven to 350 and lightly grease a 9"x5" loaf pan.
  2. Mix together 1/3 cup sugar and 2 tsp cinnamon in a small bowl. Set aside.
  3. In a large bowl, combine flour, baking powder, salt, and remaining 1 cup sugar. In another bowl, combine egg, milk, and oil. Add wet ingredients to dry. Stir until moistened.
  4. Pour half the batter into prepared pan. Sprinkle with 1/2 cinnamon and sugar mixture. Repeat with remaining batter and cinnamon / sugar. Run a knife through the batter to swirl all together.
  5. Bake for 45 - 50 minutes. Use the toothpick test to ensure doneness. Let cool in pan 10 minutes before removing to a wire rack to cool completely.

Yield: (1) 9"x5" loaf


Shared at Simple Saturdays, Simply Natural Saturdays, and some of these other fine hops.


25 May 2014

Blueberry Banana Cake Donuts

It all started with a recipe for Blueberry Cherry Baked Donuts I found over at the Taste and Tell blog. She posted it back in 2012, and I pinned it months ago. Fast forward to Christmas 2013, and Mom gives me a gift card to Bed, Bath, & Beyond (woo hoo!). A few days ago, I used a portion of it on a new donut pan. The only thing I had to do today was take my 16 month old boy to the vet, so why not take my new pan for a spin afterwards?


I decided to do just blueberry donuts early on, but at the last minute chose to throw an overripe banana in the mix. The batter might have ended up a bit thick, but the donuts are moist and tender with a hint of banana flavor in addition to the blueberry freshness, so I call it a win.

The first lesson I learned with my new donut pan, is be careful not to overfill. My first attempt could have passed for mini bundt cakes. ;-)


My second batch was much more donut-like:


I was so anxious to try them, I didn't wait for them to cool to add glaze. I just slapped some homemade cream cheese icing I had in the fridge on one and took a bite!

YUM!

I did eventually get to the glaze, though, and that made them even better. Just feast your eyes on these blueberry beauties:


If you've stuck with me this far (thank-you!), I'll bet you'd like the recipe. Give these a go, and let me know what you think.

Blueberry Banana Cake Donuts

Adapted from Deborah's Blueberry Cherry Baked Donuts at Taste & Tell blog.

Ingredients

  • 2 cups all-purpose flour
  • 2 tsp baking powder
  • 1/2 tsp cinnamon
  • 1/2 tsp salt
  • 3/4 cup sugar
  • 3/4 cup honey flavored Greek yogurt
  • 2 eggs
  • 1 tsp vanilla
  • 2 tbsp melted butter
  • 1/4 cup vegetable oil
  • 3/4 cup blueberries
  • 1 mashed ripe banana (the riper, the better)

Instructions

  1. Preheat oven to 325 degrees. Coat donut pan with non-stick spray.
  2. In a medium bowl, mix together flour, baking powder, cinnamon, and salt.
  3. In a large bowl, mix together sugar, yogurt, eggs, vanilla, melted butter, vegetable oil, and banana. Stir in flour mixture. Fold in blueberries.
  4. Fill donut pan about 2/3 full. Bake for 10 - 15 minutes. Use the toothpick test to be sure they're done. Turn out of pan and cool completely on wire rack.
  5. Whisk together 2 cups powdered sugar, 1 tsp vanilla, and 3 - 4 tbsp milk for glaze. Top donuts when cool and return to wire rack to dry.
Yield: 18 donuts

Shared at Simple Life Sunday, The Heritage Homesteaders Hop, Simple Saturdays Blog Hop, Simply Natural Saturdays, Happiness is Homemade Link Party, Tasty Tuesday, and Teach Me Tuesday.


Disclosure: This post contains affiliate links, which means I may receive a very small commission if you click the link and buy something. This helps support my blogging activities, and the price you pay will be no different than if you arrived at the same destination through any other link. My opinions are my own, to be sure. If I link to a product and say I like it -- I truly like it! :-) Thanks for reading and following Stephlin's Mountain.

24 May 2014

O.M.G. Strawberry Bread

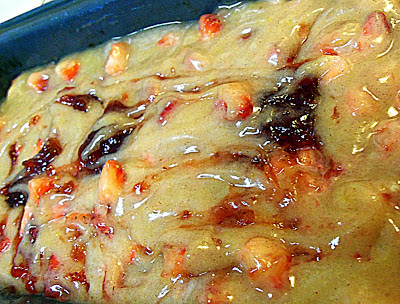
We had a good deal on some nice strawberries recently at work, so I partook and purchased a couple of pounds. Little did I know how that simple transaction would change my life. Exaggeration? I think not, but you be the judge.

I was poking around the 'net for a strawberry bread recipe, and what I found did not disappoint. After giving it a go, what resulted was quite possibly one of the best things I've ever eaten. Definitely the best strawberry bread I've ever eaten.

Yep, all that strawberry goodness in one loaf!

The recipe is from Saveur. More specifically, Saveur kitchen assistant Farideh Sadeghin. It has a yield of two loaves, but, me being me, I cut it in half for one loaf. I know that doesn't always work in baking, but this one turned out just fine.

There is cinnamon in the mix, and you can taste it nicely in the batter before baking. (I think that batter alone would make a nice coffee cake, but that's for another day.) But I got barely a hint of it after baking, so don't let that scare you. The recipe also calls for strawberry jam to be swirled into the top. Between me and you, I wouldn't do that unless maybe you had freshly made jam at your fingertips. Store bought jam (IMHO) puts a damper on the fresh strawberry flavor of the rest of the bread.


Another delectable of this loaf is the slight crisp and crunch of the crust. That sugar adds a lovely texture as well as yummy-ness.

Funny thing is, just two people managed to make that single loaf of strawberry bread disappear in about 24 hours. B (obviously) agreed with me that it was so good -- Oh. My. Goodness good. So much so, that he made a second loaf with the second pound of strawberries.

Recipe after one more enticing photo...


O.M.G. Strawberry Bread

Adapted from Saveur kitchen assistant Farideh Sadeghin's recipe here.

Ingredients

  • 1 1/2 cups flour
  • 1/2 tsp baking powder
  • 1/2 tsp ground cinnamon
  • 1/4 tsp kosher salt
  • 1 cup sugar
  • 1/2 + 1/8 (or, 5/8) cup canola oil
  • 2 eggs
  • 2 cups strawberries, roughly chopped
  • 1/4 cup strawberry jam (optional)

Instructions

  1. Heat oven to 350°, and grease a 9x5 loaf pan.
  2. Whisk flour, baking powder, cinnamon, and salt in a large bowl.
  3. Whisk sugar, oil, and eggs in a separate bowl. Combine wet ingredients into dry ingredients. Stir in strawberries.
  4. Pour batter into pan. If using jam, just dollop across the top and swirl into batter.
  5. Bake until golden brown, about an hour (mine took 1 hr, 6 min). Let cool a bit before turning it out of the pan -- about 30 minutes.
Yield: 1 loaf


Shared at Simple Saturdays Blog Hop, Simply Natural Saturdays, Old-Fashioned Friday, From the Farm Blog Hop, Freedom Fridays, and Farmgirl Friday Blog Hop.

20 May 2014

Rice Pudding and (Real!) Caramel Sauce

I like to bake. It's actually what I do for a living -- in a production dominated setting with not a lot of play time. But, truth be told, I don't do it at home often enough. I'm trying rectify that.

So, to get started, I simply walked into my pantry and opened up the first cookbook I saw. My guy really enjoys cooking the savory, so the book on top was one of his faves: Three Guys from Miami Cook Cuban. I didn't expect to find much in the way of desserts, as that section is a bit small. I was proven wrong, however. I adore rice pudding (without raisins) so that was an easy pick. A couple of pages later was a caramel sauce recipe (which I have never made unless you count unwrapping the candies and melting them), so I knew I had found my first endeavor. Since this is a Cuban cookbook, it's officially called Arroz con Leche and Dulce de Leche Salsa.

Here we go!

Rice Pudding ingredients (pg. 198):
1/2 cup uncooked rice
1 1/2 cups water
1 lemon rind (I omitted this)
1 cinnamon stick
5 cups whole milk
1/4 tsp. salt
1 tsp. vanilla extract
1 1/4 cup white cane sugar (I used regular granulated)
ground cinnamon (I didn't use since I was making the caramel sauce)

I cooked the rice and water with the cinnamon stick for about 15 minutes. The directions suggest you skim off any excess water, but I had very little (as I believe is the correct result). They also say to remove the cinnamon stick, but I did not. Left it in for the entire cooking time.

I next added the milk, salt, vanilla extract, and sugar to the rice. The directions say to cook it uncovered over low heat for 45 minutes to an hour. It's probably my stove, but it took waaay longer than that for me. I eventually turned it up to get it going, then turned it down when it showed signs of thickening. Be sure to stir it often so there's no burning.

Almost done!

On to the caramel sauce! (a.k.a. the Star of the Show)

Ingredients (pg. 203):
1 cup sugar
1/2 cup water
3 tbsp. light corn syrup
8 tbsp. butter
1 1/4 cup heavy cream

Since I had never truly made caramel sauce before, I followed the recipe to a T. There was a whole lot of boiling and stirring -- my arm got quite tired -- but I will never take the short cut on caramel sauce again. I promise you, it's that good.

My warped whisk worked just fine!

I did take the advice of the Three Guys and put the cooled caramel sauce in a glass container so it will be easy to microwave. This stuff is yu-um. I know I ate far too much of it alone with a spoon. BTW, it was good with the rice pudding, too! :-)


I didn't have any cute, dainty bowls handy -- my
Peacock Fiestaware had to do!

Shared at the Homestead Barn Hop, Homemade Mondays, Tuesdays With a Twist, and Tasty Tuesdays.


Disclosure: This post contains an affiliate link, which means I may receive a very small commission if you click the link and buy something. This helps support my blogging activities, and the price you pay will be no different than if you arrived at the same destination through any other link. My opinions are my own, to be sure. If I link to a product and say I like it -- I truly like it! :-) Thanks for reading and following Stephlin's Mountain.

Related Posts Plugin for WordPress, Blogger...